Redis主从复制以及主从复制原理
Redis是一个开源的底层使用C语言编写的key-value存储数据库。可用于缓存、事件发布订阅、高速队列等场景。而且支持丰富的数据类型:string(字符串)、hash(哈希)、list(列表)、set(无序集合)、zset(sorted set:有序集合).
概述:
在现有企业中80%公司大部分使用的是redis单机服务,在实际的场景当中单一节点的redis容易面临风险。
面临问题:
1、机器故障。我们部署到一台 Redis 服务器,当发生机器故障时,需要迁移到另外一台服务器并且要保证数据是同步的。
2、容量瓶颈。当我们有需求需要扩容 Redis 内存时,从 16G 的内存升到 64G,单机肯定是满足不了。当然,你可以重新买个 128G 的新机器。
解决办法:
要实现分布式数据库的更大的存储容量和承受高并发访问量,我们会将原来集中式数据库的数据分别存储到其他多个网络节点上。
Redis 为了解决这个单一节点的问题,也会把数据复制多个副本部署到其他节点上进行复制,实现 Redis的高可用,实现对数据的冗余备份,从而保证数据和服务的高可用。
1、什么是主从复制?

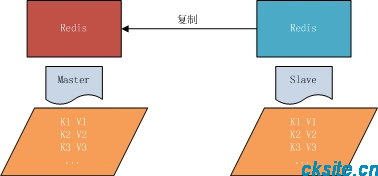
主从复制,是指将一台Redis服务器的数据,复制到其他的Redis服务器。前者称为主节点(master),后者称为从节点(slave),数据的复制是单向的,只能由主节点到从节点。
默认情况下,每台Redis服务器都是主节点;且一个主节点可以有多个从节点(或没有从节点),但一个从节点只能有一个主节点。
2、主从复制的作用?
1)、数据冗余:主从复制实现了数据的热备份,是持久化之外的一种数据冗余方式。
2)、故障恢复:当主节点出现问题时,可以由从节点提供服务,实现快速的故障恢复;实际上是一种服务的冗余。
3)、负载均衡:在主从复制的基础上,配合读写分离,可以由主节点提供写服务,由从节点提供读服务(即写Redis数据时应用连接主节点,读Redis数据时应用连接从节点),分担服务器负载;尤其是在写少读多的场景下,通过多个从节点分担读负载,可以大大提高Redis服务器的并发量。
4)、读写分离:可以用于实现读写分离,主库写、从库读,读写分离不仅可以提高服务器的负载能力,同时可根据需求的变化,改变从库的数量;
5)、高可用基石:除了上述作用以外,主从复制还是哨兵和集群能够实施的基础,因此说主从复制是Redis高可用的基础。
3、主从复制启用?
从节点开启主从复制,有3种方式:
1)、配置文件: 在从服务器的配置文件中加入:slaveof <masterip> <masterport>
2)、启动命令: redis-server启动命令后加入 --slaveof <masterip> <masterport>
3)、客户端命令: Redis服务器启动后,直接通过客户端执行命令:slaveof <masterip><masterport>,则该Redis实例成为从节点。
通过 info replication 命令可以看到复制的一些信息
4、主从复制原理?
主从复制过程大体可以分为3个阶段:连接建立阶段(即准备阶段)、数据同步阶段、命令传播阶段。
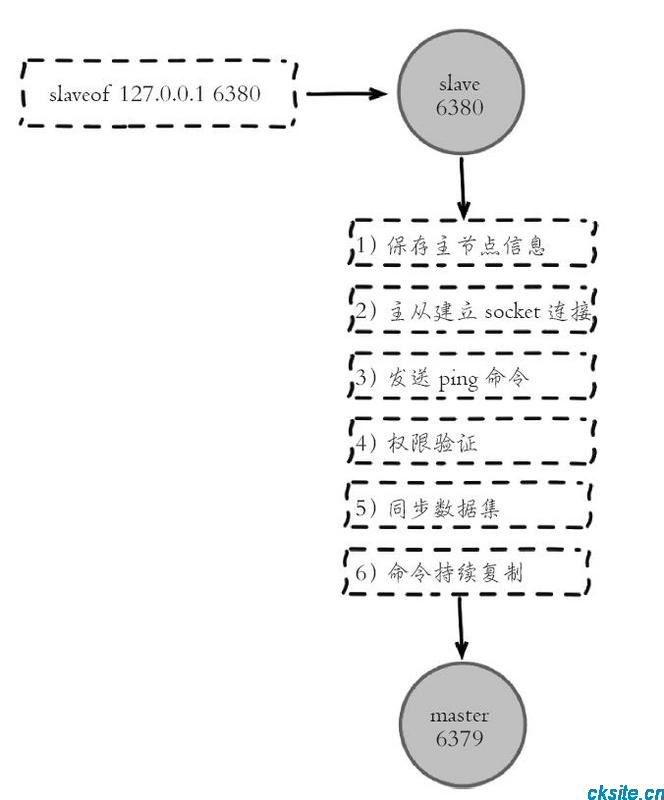
在从节点执行 slaveof 命令后,复制过程便开始运作,下面图示大概可以看到,
从图中可以看出复制过程大致分为6个过程

主从配置之后的日志记录也可以看出这个流程
1)保存主节点(master)信息。
执行 slaveof 后 Redis 会打印如下日志:

2)从节点(slave)内部通过每秒运行的定时任务维护复制相关逻辑,当定时任务发现存在新的主节点后,会尝试与该节点建立网络连接

从节点与主节点建立网络连接
从节点会建立一个 socket 套接字,从节点建立了一个端口为51234的套接字,专门用于接受主节点发送的复制命令。从节点连接成功后打印如下日志:

如果从节点无法建立连接,定时任务会无限重试直到连接成功或者执行 slaveof no one 取消复制
关于连接失败,可以在从节点执行 info replication 查看 master_link_down_since_seconds 指标,它会记录与主节点连接失败的系统时间。从节点连接主节点失败时也会每秒打印如下日志,方便发现问题:
# Error condition on socket for SYNC: {socket_error_reason}
3)发送 ping 命令。
连接建立成功后从节点发送 ping 请求进行首次通信,ping 请求主要目的如下:
检测主从之间网络套接字是否可用。
检测主节点当前是否可接受处理命令。
如果发送 ping 命令后,从节点没有收到主节点的 pong 回复或者超时,比如网络超时或者主节点正在阻塞无法响应命令,从节点会断开复制连接,下次定时任务会发起重连。

从节点发送的 ping 命令成功返回,Redis 打印如下日志,并继续后续复制流程:

4)权限验证。如果主节点设置了 requirepass 参数,则需要密码验证,从节点必须配置 masterauth 参数保证与主节点相同的密码才能通过验证;如果验证失败复制将终止,从节点重新发起复制流程。
5)同步数据集。主从复制连接正常通信后,对于首次建立复制的场景,主节点会把持有的数据全部发送给从节点,这部分操作是耗时最长的步骤。
6)命令持续复制。当主节点把当前的数据同步给从节点后,便完成了复制的建立流程。接下来主节点会持续地把写命令发送给从节点,保证主从数据一致性。
5)、Redis主从复制可以根据是否是全量分为全量同步和增量同步:
1.全量同步
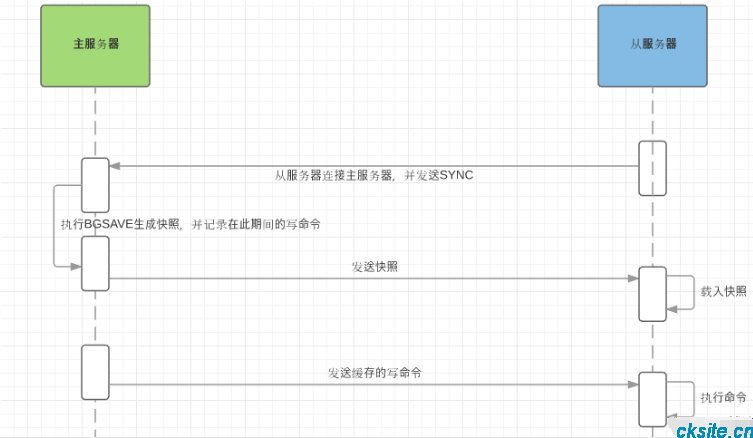
Redis全量复制一般发生在Slave初始化阶段,这时Slave需要将Master上的所有数据都复制一份。具体步骤如下:
1)从服务器连接主服务器,发送SYNC命令;
2)主服务器接收到SYNC命名后,开始执行BGSAVE命令生成RDB文件并使用缓冲区记录此后执行的所有写命令;
3)主服务器BGSAVE执行完后,向所有从服务器发送快照文件,并在发送期间继续记录被执行的写命令;
4)从服务器收到快照文件后丢弃所有旧数据,载入收到的快照;
5)主服务器快照发送完毕后开始向从服务器发送缓冲区中的写命令;
6)从服务器完成对快照的载入,开始接收命令请求,并执行来自主服务器缓冲区的写命令;

完成上面几个步骤后就完成了从服务器数据初始化的所有操作,从服务器此时可以接收来自用户的读请求。
2. 增量同步
Redis增量复制是指Slave初始化后开始正常工作时主服务器发生的写操作同步到从服务器的过程。 增量复制的过程主要是主服务器每执行一个写命令就会向从服务器发送相同的写命令,从服务器接收并执行收到的写命令。
3、Redis主从同步策略
主从刚刚连接的时候,进行全量同步;全同步结束后,进行增量同步。当然,如果有需要,slave 在任何时候都可以发起全量同步。redis 策略是,无论如何,首先会尝试进行增量同步,如不成功,要求从机进行全量同步。
如果多个Slave断线了,需要重启的时候,因为只要Slave启动,就会发送sync请求和主机全量同步,当多个同时出现的时候,可能会导致Master IO剧增导致宕机。
建议开启master主服务器的持久化功能,避免出现master重启后,数据无法恢复;
6、哨兵(主从切换)配置
Redis官方提供了一个工具sentinel(哨兵),sentinel在下载的redis源码里。
sentinel系统会执行以下3个任务:
1、监控(Monitoring):不断的检查你的主服务器和从服务器是否运行正常;
2、通知(Notification):当被监控的某个redis服务器出现问题时,Sentinel可以通过API向管理员或者其他应用程序发送通知;
3、自动故障迁移(Automatic failover):当一个主服务器不能正常工作时,sentinel会开始一次自动故障迁移操作,它会将失效的主服务器的其中一个从服务器升级为新的主服务器,并让失效主服务器的其他从服务器为复制新的主服务器。当客户端试图连接失效的主服务器时,集群也会向客户端返回新主服务器地址,使得集群可以使用新主服务器代替失效服务器。
具体操作及配置、验证流程:
1.准备一台虚拟机
2.安装redis服务
3.copy一份redis配置文件,当作两台机器
4.配置主从
5.测试,
6.从redis服务主动断开,模仿故障流程。
1.安装redis服务
[root@localhost ~]# cd /usr/local/src/
[root@localhost src]# tar -zxvf redis-5.0.3.tar.gz
[root@localhost src]# cd redis-5.0.3/
[root@localhost redis-5.0.3]# make
[root@localhost src]# cd src/
[root@localhost src]# pwd
/usr/local/src/redis-5.0.3/src
2.copy一份redis配置文件
[root@localhost redis-5.0.3]# ls
00-RELEASENOTES  CONTRIBUTING  deps     Makefile   README.md   runtest          runtest-sentinel  src    utils
BUGS             COPYING       INSTALL  MANIFESTO  redis.conf  runtest-cluster  sentinel.conf     tests
[root@localhost redis-5.0.3]# cp redis.conf redis_6380.conf             ##复制另一份配置
[root@localhost redis-5.0.3]# ls -al
总用量 320
drwxrwxr-x   6 root root   332 3月  15 11:35 .
drwxr-xr-x. 11 root root  4096 3月  15 11:13 ..
-rw-rw-r--   1 root root 92434 12月 12 20:25 00-RELEASENOTES
-rw-rw-r--   1 root root    53 12月 12 20:25 BUGS
-rw-rw-r--   1 root root  1894 12月 12 20:25 CONTRIBUTING
-rw-rw-r--   1 root root  1487 12月 12 20:25 COPYING
drwxrwxr-x   6 root root   192 3月  15 11:14 deps
-rw-rw-r--   1 root root   376 12月 12 20:25 .gitignore
-rw-rw-r--   1 root root    11 12月 12 20:25 INSTALL
-rw-rw-r--   1 root root   151 12月 12 20:25 Makefile
-rw-rw-r--   1 root root  4223 12月 12 20:25 MANIFESTO
-rw-rw-r--   1 root root 20555 12月 12 20:25 README.md
-rw-r--r--   1 root root 62155 3月  15 11:35 redis_6380.conf
-rw-rw-r--   1 root root 62155 12月 12 20:25 redis.conf
-rwxrwxr-x   1 root root   275 12月 12 20:25 runtest
-rwxrwxr-x   1 root root   280 12月 12 20:25 runtest-cluster
-rwxrwxr-x   1 root root   281 12月 12 20:25 runtest-sentinel
-rw-rw-r--   1 root root  9710 12月 12 20:25 sentinel.conf
drwxrwxr-x   3 root root  8192 3月  15 11:33 src
drwxrwxr-x  10 root root   167 12月 12 20:25 tests
drwxrwxr-x   8 root root  4096 12月 12 20:25 utils
[root@localhost redis-5.0.3]# chmod -R 664 redis_6380.conf                 ##更改文件属性
[root@localhost redis-5.0.3]# ls -al
总用量 320
drwxrwxr-x   6 root root   332 3月  15 11:35 .
drwxr-xr-x. 11 root root  4096 3月  15 11:13 ..
-rw-rw-r--   1 root root 92434 12月 12 20:25 00-RELEASENOTES
-rw-rw-r--   1 root root    53 12月 12 20:25 BUGS
-rw-rw-r--   1 root root  1894 12月 12 20:25 CONTRIBUTING
-rw-rw-r--   1 root root  1487 12月 12 20:25 COPYING
drwxrwxr-x   6 root root   192 3月  15 11:14 deps
-rw-rw-r--   1 root root   376 12月 12 20:25 .gitignore
-rw-rw-r--   1 root root    11 12月 12 20:25 INSTALL
-rw-rw-r--   1 root root   151 12月 12 20:25 Makefile
-rw-rw-r--   1 root root  4223 12月 12 20:25 MANIFESTO
-rw-rw-r--   1 root root 20555 12月 12 20:25 README.md
-rw-rw-r--   1 root root 62155 3月  15 11:35 redis_6380.conf
-rw-rw-r--   1 root root 62155 12月 12 20:25 redis.conf
-rwxrwxr-x   1 root root   275 12月 12 20:25 runtest
-rwxrwxr-x   1 root root   280 12月 12 20:25 runtest-cluster
-rwxrwxr-x   1 root root   281 12月 12 20:25 runtest-sentinel
-rw-rw-r--   1 root root  9710 12月 12 20:25 sentinel.conf
drwxrwxr-x   3 root root  8192 3月  15 11:33 src
drwxrwxr-x  10 root root   167 12月 12 20:25 tests
drwxrwxr-x   8 root root  4096 12月 12 20:25 utils

[root@localhost redis-5.0.3]# vim redis_6380.conf
port 6380                       ##修改端口号6379 改为 6380
slaveof  192.168.216.160  6379           ##配置Redis 复制功能,将该内容加进 slave 的配置文件
3.启动服务
root@localhost src]# ./redis-server ../redis.conf            ##启动主服务器
7998:C 15 Mar 2019 11:40:23.222 # oO0OoO0OoO0Oo Redis is starting oO0OoO0OoO0Oo
7998:C 15 Mar 2019 11:40:23.222 # Redis version=5.0.3, bits=64, commit=00000000, modified=0, pid=7998, just started
7998:C 15 Mar 2019 11:40:23.222 # Configuration loaded
7998:M 15 Mar 2019 11:40:23.223 * Increased maximum number of open files to 10032 (it was originally set to 1024).
                _._
           _.-``__ ''-._
      _.-``    `.  `_.  ''-._           Redis 5.0.3 (00000000/0) 64 bit
  .-`` .-```.  ```\/    _.,_ ''-._
 (    '      ,       .-`  | `,    )     Running in standalone mode
 |`-._`-...-` __...-.``-._|'` _.-'|     Port: 6379
 |    `-._   `._    /     _.-'    |     PID: 7998
  `-._    `-._  `-./  _.-'    _.-'
 |`-._`-._    `-.__.-'    _.-'_.-'|
 |    `-._`-._        _.-'_.-'    |           http://redis.io
  `-._    `-._`-.__.-'_.-'    _.-'
 |`-._`-._    `-.__.-'    _.-'_.-'|
 |    `-._`-._        _.-'_.-'    |
  `-._    `-._`-.__.-'_.-'    _.-'
      `-._    `-.__.-'    _.-'
          `-._        _.-'
              `-.__.-'

7998:M 15 Mar 2019 11:40:23.224 # WARNING: The TCP backlog setting of 511 cannot be enforced because /proc/sys/net/core/somaxconn is set to the lower value of 128.
7998:M 15 Mar 2019 11:40:23.224 # Server initialized
7998:M 15 Mar 2019 11:40:23.224 # WARNING overcommit_memory is set to 0! Background save may fail under low memory condition. To fix this issue add 'vm.overcommit_memory = 1' to /etc/sysctl.conf and then reboot or run the command 'sysctl vm.overcommit_memory=1' for this to take effect.
7998:M 15 Mar 2019 11:40:23.224 # WARNING you have Transparent Huge Pages (THP) support enabled in your kernel. This will create latency and memory usage issues with Redis. To fix this issue run the command 'echo never > /sys/kernel/mm/transparent_hugepage/enabled' as root, and add it to your /etc/rc.local in order to retain the setting after a reboot. Redis must be restarted after THP is disabled.
7998:M 15 Mar 2019 11:40:23.224 * DB loaded from disk: 0.000 seconds
7998:M 15 Mar 2019 11:40:23.224 * Ready to accept connections

[root@localhost src]# ./redis-server ../redis_6380.conf     ##启动从服务器
8028:C 15 Mar 2019 11:41:01.658 # oO0OoO0OoO0Oo Redis is starting oO0OoO0OoO0Oo
8028:C 15 Mar 2019 11:41:01.658 # Redis version=5.0.3, bits=64, commit=00000000, modified=0, pid=8028, just started
8028:C 15 Mar 2019 11:41:01.658 # Configuration loaded
8028:S 15 Mar 2019 11:41:01.661 * Increased maximum number of open files to 10032 (it was originally set to 1024).
                _._
           _.-``__ ''-._
      _.-``    `.  `_.  ''-._           Redis 5.0.3 (00000000/0) 64 bit
  .-`` .-```.  ```\/    _.,_ ''-._
 (    '      ,       .-`  | `,    )     Running in standalone mode
 |`-._`-...-` __...-.``-._|'` _.-'|     Port: 6380
 |    `-._   `._    /     _.-'    |     PID: 8028
  `-._    `-._  `-./  _.-'    _.-'
 |`-._`-._    `-.__.-'    _.-'_.-'|
 |    `-._`-._        _.-'_.-'    |           http://redis.io
  `-._    `-._`-.__.-'_.-'    _.-'
 |`-._`-._    `-.__.-'    _.-'_.-'|
 |    `-._`-._        _.-'_.-'    |
  `-._    `-._`-.__.-'_.-'    _.-'
      `-._    `-.__.-'    _.-'
          `-._        _.-'
              `-.__.-'

8028:S 15 Mar 2019 11:41:01.663 # WARNING: The TCP backlog setting of 511 cannot be enforced because /proc/sys/net/core/somaxconn is set to the lower value of 128.
8028:S 15 Mar 2019 11:41:01.663 # Server initialized
8028:S 15 Mar 2019 11:41:01.663 # WARNING overcommit_memory is set to 0! Background save may fail under low memory condition. To fix this issue add 'vm.overcommit_memory = 1' to /etc/sysctl.conf and then reboot or run the command 'sysctl vm.overcommit_memory=1' for this to take effect.
8028:S 15 Mar 2019 11:41:01.663 # WARNING you have Transparent Huge Pages (THP) support enabled in your kernel. This will create latency and memory usage issues with Redis. To fix this issue run the command 'echo never > /sys/kernel/mm/transparent_hugepage/enabled' as root, and add it to your /etc/rc.local in order to retain the setting after a reboot. Redis must be restarted after THP is disabled.
8028:S 15 Mar 2019 11:41:01.663 * DB loaded from disk: 0.000 seconds
8028:S 15 Mar 2019 11:41:01.663 * Ready to accept connections
8028:S 15 Mar 2019 11:41:01.664 * Connecting to MASTER 192.168.216.160:6379
8028:S 15 Mar 2019 11:41:01.664 * MASTER <-> REPLICA sync started
8028:S 15 Mar 2019 11:41:01.664 # Error condition on socket for SYNC: Connection refused
8028:S 15 Mar 2019 11:41:02.674 * Connecting to MASTER 192.168.216.160:6379
8028:S 15 Mar 2019 11:41:02.674 * MASTER <-> REPLICA sync started
8028:S 15 Mar 2019 11:41:02.674 # Error condition on socket for SYNC: Connection refused
8028:S 15 Mar 2019 11:41:03.683 * Connecting to MASTER 192.168.216.160:6379
8028:S 15 Mar 2019 11:41:03.683 * MASTER <-> REPLICA sync started
8028:S 15 Mar 2019 11:41:03.683 # Error condition on socket for SYNC: Connection refused
8028:S 15 Mar 2019 11:41:04.693 * Connecting to MASTER 192.168.216.160:6379
4.Redis主从配置异常解决:Error condition on socket for SYNC: Connection refused
解决方案:
在redis主服务器上的redis.conf中修改bind字段,将
bind 127.0.0.1
修改为:
bind 0.0.0.0
又或者直接注释掉bind字段
# bind 127.0.0.1
原因:
如果redis主服务器绑定了127.0.0.1,那么跨服务器IP的访问就会失败,从服务器用IP和端口访问主的时候,主服务器发现本机6379端口绑在了127.0.0.1上,也就是只能本机才能访问,外部请求会被过滤,这是linux的网络安全策略管理的。如果bind的IP地址是172.168.10.70,那么本机通过localhost和127.0.0.1、或者直接输入命令redis-cli登录本机redis也就会失败了。只能加上本机ip才能访问到。
所以,在研发、测试环境可以考虑bind 0.0.0.0,线上生产环境建议绑定IP地址。
5.测试
[root@localhost src]# ./redis-cli                                 ##redis主服务
127.0.0.1:6379> get foo
"cuikai"
127.0.0.1:6379> get foo1
"bar1"
127.0.0.1:6379>

[root@localhost ~]# cd /usr/local/src/redis-5.0.3/src
[root@localhost src]# ./redis-cli -p 6380                        ##redis从服务
127.0.0.1:6380> get foo
"cuikai"
127.0.0.1:6380> get foo1
"bar1"
127.0.0.1:6380>
6.查看当前redis的服务
[root@localhost ~]# ps -ef | grep redis                      ##查看当前启动的redis服务列表
root       8417   7416  0 11:53 pts/1    00:00:03 ./redis-server 0.0.0.0:6379
root       8493   8255  0 11:54 pts/4    00:00:00 ./redis-cli
root       8730   7911  0 12:05 pts/2    00:00:01 ./redis-server 127.0.0.1:6380
root       8734   8437  0 12:05 pts/0    00:00:00 ./redis-cli -p 6380
7.【从redis服务主动断开后】
8.更改主redis里某个字段的值
[root@localhost src]# ./redis-cli                           ##主redis更改
127.0.0.1:6379> set hailong 20
OK
127.0.0.1:6379> get hailong
"20"
127.0.0.1:6379>

127.0.0.1:6380> get hailong                              ##从redis获取,连接失败
Could not connect to Redis at 127.0.0.1:6380: Connection refused
not connected>
9.主redis服务日志
【主redis服务日志】
8417:M 15 Mar 2019 12:01:27.044 # Connection with replica 127.0.0.1:6380 lost.
10.【从redis重新启动】
[root@localhost src]# ./redis-server ../redis_6380.conf
8730:C 15 Mar 2019 12:05:47.391 # oO0OoO0OoO0Oo Redis is starting oO0OoO0OoO0Oo
8730:C 15 Mar 2019 12:05:47.391 # Redis version=5.0.3, bits=64, commit=00000000, modified=0, pid=8730, just started
8730:C 15 Mar 2019 12:05:47.391 # Configuration loaded
8730:S 15 Mar 2019 12:05:47.392 * Increased maximum number of open files to 10032 (it was originally set to 1024).
                _._
           _.-``__ ''-._
      _.-``    `.  `_.  ''-._           Redis 5.0.3 (00000000/0) 64 bit
  .-`` .-```.  ```\/    _.,_ ''-._
 (    '      ,       .-`  | `,    )     Running in standalone mode
 |`-._`-...-` __...-.``-._|'` _.-'|     Port: 6380
 |    `-._   `._    /     _.-'    |     PID: 8730
  `-._    `-._  `-./  _.-'    _.-'
 |`-._`-._    `-.__.-'    _.-'_.-'|
 |    `-._`-._        _.-'_.-'    |           http://redis.io
  `-._    `-._`-.__.-'_.-'    _.-'
 |`-._`-._    `-.__.-'    _.-'_.-'|
 |    `-._`-._        _.-'_.-'    |
  `-._    `-._`-.__.-'_.-'    _.-'
      `-._    `-.__.-'    _.-'
          `-._        _.-'
              `-.__.-'

8730:S 15 Mar 2019 12:05:47.393 # WARNING: The TCP backlog setting of 511 cannot be enforced because /proc/sys/net/core/somaxconn is set to the lower value of 128.
8730:S 15 Mar 2019 12:05:47.393 # Server initialized
8730:S 15 Mar 2019 12:05:47.393 # WARNING overcommit_memory is set to 0! Background save may fail under low memory condition. To fix this issue add 'vm.overcommit_memory = 1' to /etc/sysctl.conf and then reboot or run the command 'sysctl vm.overcommit_memory=1' for this to take effect.
8730:S 15 Mar 2019 12:05:47.393 # WARNING you have Transparent Huge Pages (THP) support enabled in your kernel. This will create latency and memory usage issues with Redis. To fix this issue run the command 'echo never > /sys/kernel/mm/transparent_hugepage/enabled' as root, and add it to your /etc/rc.local in order to retain the setting after a reboot. Redis must be restarted after THP is disabled.
8730:S 15 Mar 2019 12:05:47.394 * DB loaded from disk: 0.000 seconds
8730:S 15 Mar 2019 12:05:47.394 * Before turning into a replica, using my master parameters to synthesize a cached master: I may be able to synchronize with the new master with just a partial transfer.
8730:S 15 Mar 2019 12:05:47.394 * Ready to accept connections
8730:S 15 Mar 2019 12:05:47.394 * Connecting to MASTER 192.168.216.160:6379
8730:S 15 Mar 2019 12:05:47.394 * MASTER <-> REPLICA sync started
8730:S 15 Mar 2019 12:05:47.394 * Non blocking connect for SYNC fired the event.
8730:S 15 Mar 2019 12:05:47.395 * Master replied to PING, replication can continue...
8730:S 15 Mar 2019 12:05:47.423 * Trying a partial resynchronization (request 19c1c142e6891cb2e0d5517930ed35bebf973ea5:716).
8730:S 15 Mar 2019 12:05:47.426 * Successful partial resynchronization with master.
8730:S 15 Mar 2019 12:05:47.426 * MASTER <-> REPLICA sync: Master accepted a Partial Resynchronization.
11.【主redis服务日志】
8417:M 15 Mar 2019 12:05:47.425 * Replica 127.0.0.1:6380 asks for synchronization
8417:M 15 Mar 2019 12:05:47.425 * Partial resynchronization request from 127.0.0.1:6380 accepted. Sending 34 bytes of backlog starting from offset 716.
8417:M 15 Mar 2019 12:08:32.052 * 1 changes in 900 seconds. Saving...
8417:M 15 Mar 2019 12:08:32.052 * Background saving started by pid 8775
8775:C 15 Mar 2019 12:08:32.060 * DB saved on disk
8775:C 15 Mar 2019 12:08:32.061 * RDB: 0 MB of memory used by copy-on-write
8417:M 15 Mar 2019 12:08:32.153 * Background saving terminated with success
12.从redis再次获取修改的字段的值
[root@localhost src]# ./redis-cli -p 6380                    ##从redis同步更新后再次获取数据
127.0.0.1:6380> get hailong
"20"
127.0.0.1:6380>
官方网站:http://redis.io/
参考网站:
http://redisdoc.com/topic/cluster-tutorial.html
附常用命令:
配置文件位置:
        find / -name 'redis*.conf'

查看redis信息(查看是否启动成功):
        ps -ef | grep redis

可以看到redis监听端口:
                netstat -tnlp | grep redis


启动redis服务端:
    #启动redis(使用redis.conf启动 redis-server文件)  (注意:对应配置文件的路径地址)
    redis-server redis_6379.conf
    redis-server redis_6380.conf

启动redis客户端(登陆redis):
    redis-cli -h 192.168.1.100 -p 6379 -a pwd@123
    redis-cli -h 192.168.1.115 -p 6380 -a pwd@123

关闭redis:
    redis-cli shutdown       (shutdown)

关闭指定端口:
    redis-cli -p port shutdown

Slaver连接Master:
    slaveof host:ip          (测试时使用slaveof手动连接master,正式环境使用配置文件)

查看主从信息:    (info Replication)
    redis-cli -h 192.168.1.100 -p 6379 -a pwd@123 info replication
    redis-cli -h 192.168.1.115 -p 6380 -a pwd@123 info replication
修改redis配置(redis.conf)常用参数:
a) 设置服务端口
    port 6379
b) 设置为后台服务(此时的redis启动直接占据控制台,我们可以将其修改为后台启动)
    daemonize    yes
附:
客户端安装包(RedisDesktopManager):
1、https://github.com/uglide/RedisDesktopManager
2、https://redisdesktop.com/download
本文为崔凯原创文章,转载无需和我联系,但请注明来自冷暖自知一抹茶ckhttp://www.cksite.cn

- 最新评论
- 总共0条评论

