docker 部署nginx+php+mysql
第二步:安装Nginx
使用docker pull命令,在线拉取nginx镜像,如果没有特殊版本需求,可直接输入nginx:latest
C:\Users\2023020701>docker pull nginx:latest
latest: Pulling from library/nginx
3f9582a2cbe7: Pull complete
9a8c6f286718: Pull complete
e81b85700bc2: Pull complete
73ae4d451120: Pull complete
6058e3569a68: Pull complete
3a1b8f201356: Pull complete
Digest: sha256:aa0afebbb3cfa473099a62c4b32e9b3fb73ed23f2a75a65ce1d4b4f55a5c2ef2
Status: Downloaded newer image for nginx:latest
docker.io/library/nginx:latest
在docker desktop上,可以点击images选项进行查看,镜像是否拉取成功。

也可以通过命令行进行查看:
C:\Users\2023020701>docker images
REPOSITORY   TAG       IMAGE ID       CREATED       SIZE
nginx        latest    904b8cb13b93   2 weeks ago   142MB
第三步:安装PHP
这里我们选择7.4版本的php,如果没有版本需求,也可以输入php:latest
C:\Users\2023020701>docker pull php:7.4-fpm
7.4-fpm: Pulling from library/php
a603fa5e3b41: Pull complete
c428f1a49423: Pull complete
156740b07ef8: Pull complete
fb5a4c8af82f: Pull complete
972155ae644b: Pull complete
a8e3b94fe6c1: Pull complete
93346a3f46bc: Pull complete
b922b67ca46b: Pull complete
6137f893bda6: Pull complete
79b1a1b78461: Pull complete
Digest: sha256:3ac7c8c74b2b047c7cb273469d74fc0d59b857aa44043e6ea6a0084372811d5b
Status: Downloaded newer image for php:7.4-fpm
docker.io/library/php:7.4-fpm

C:\Users\2023020701>docker images
REPOSITORY   TAG       IMAGE ID       CREATED        SIZE
nginx        latest    ac232364af84   4 days ago     142MB
php          7.4-fpm   38f2b691dcb8   4 months ago   443MB
第四步:启动PHP容器
C:\Users\2023020701>docker run --name myphp-fpm -v D:/docker/www.ck.com:/www -d 38f2b691dcb8
60af9ddc091c214df150b2cf070f4fb6eeac5e3c0a3b4e59c616f0832c885907
其中,myphp-fpm是我给php容器起的名字,D:/web/www.ck.com是我在本地创建的一个文件目录,用来对应docker的www,38f2b691dcb8是php的镜像ID。

容器启动正常,在docker desktop的Containers选项中可以看到如下记录,Status显示running,代表容器启动成功。

也可以使用命令行来查看
C:\Users\2023020701>docker ps
CONTAINER ID   IMAGE          COMMAND                  CREATED          STATUS          PORTS      NAMES
60af9ddc091c   38f2b691dcb8   "docker-php-entrypoi…"   47 seconds ago   Up 46 seconds   9000/tcp   myphp-fpm
第五步:启动Nginx容器并关联PHP,这一步很重要。
C:\Users\2023020701>docker run --name nginx -p 8080:80 -d -v D:/docker/www.ck.com:/usr/share/nginx/html -v D:/docker/nginx/conf/conf.d:/etc/nginx/conf.d --link myphp-fpm:php nginx
3cf761fae1c2d61eccd6ab142be9ba39c9ec17c634e9f6848f242b13b5335dbe
其中nginx是我起的nginx容器的名字
8080:80代表,通过浏览器访问8080端口,在docker中对应的是80端口
D:/docker/www.ck.com是本地的挂载目录,windows下也可以c:/docker/...加上盘符,/usr/share/nginx/html是nginx默认的网页root
路径
D:/docker/www.ck.com/conf/conf.d是本地的挂载目录,对应的nginx路径是/etc/nginx/conf.d,这个文件夹主要用于存放default.conf配置文件。
--link myphp-fpm:php 这个参数很重要,代表运行nginx的时候要关联php容器。
容器运行状态:

第六部:复制配置文件和网页文件到nginx容器中。
执行到这一步,虽然nginx和php容器都已经运行正常了,但是你通过浏览器访问还是404。
原因在于nginx容器中没有default.conf和index.php文件。所以,最后一步就是cp这两个文件到nginx容器的制定目录下,然后再重启nginx容器。
C:\Users\2023020701>docker cp D:/docker/www.ck.com/index.php nginx:/usr/share/nginx/html

C:\Users\2023020701>docker cp D:/docker/www.ck.com/conf/conf.d/default.conf nginx:/etc/nginx/conf.d
重启nginx容器
C:\Users\2023020701>docker restart nginx
这里给出index.php的内容:
<?php
    echo phpinfo();
?>
和default.conf的内容:
server {
    listen       80;
    server_name  localhost;    #这里修改成自己的域名,我这里是本地运行所以填的localhost
    location / {
        root   /usr/share/nginx/html;
        index  index.html index.htm index.php;
    }

    error_page   500 502 503 504  /50x.html;
    location = /50x.html {
        root   /usr/share/nginx/html;
    }

        #fastcgi_pass 127.0.0.1:9000
    location ~ \.php$ {
        fastcgi_pass   myphp-fpm:9000;
        fastcgi_index  index.php;
        fastcgi_param  SCRIPT_FILENAME  /www/$fastcgi_script_name;
        include     fastcgi_params;
    }
}
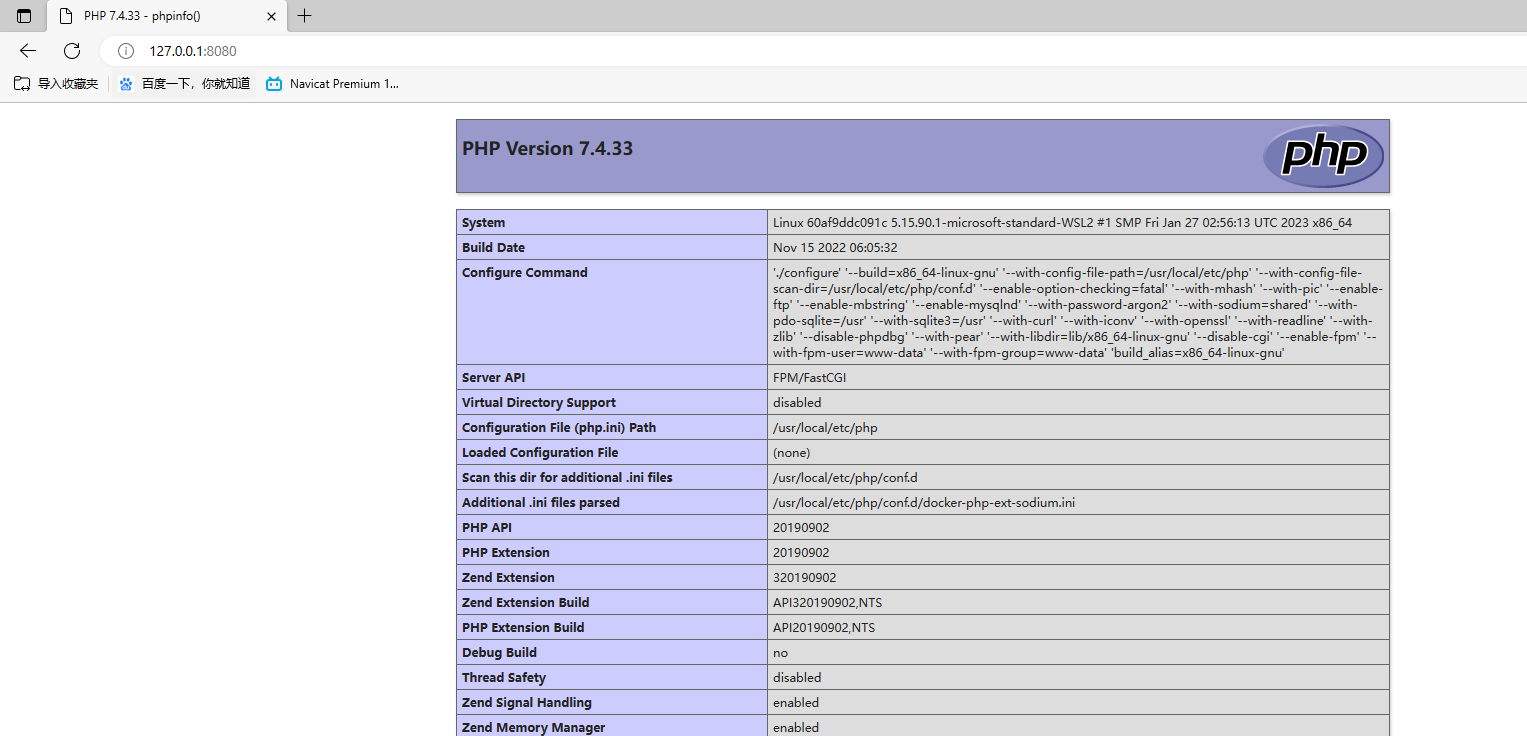
最后通过浏览器访问:
http://localhost:8080 或者 http://127.0.0.1:8080

第七步:安装MySQL
C:\Users\2023020701>docker pull mysql:5.7.36
5.7.36: Pulling from library/mysql
72a69066d2fe: Pull complete
93619dbc5b36: Pull complete
99da31dd6142: Pull complete
626033c43d70: Pull complete
37d5d7efb64e: Pull complete
ac563158d721: Pull complete
d2ba16033dad: Pull complete
0ceb82207cd7: Pull complete
37f2405cae96: Pull complete
e2482e017e53: Pull complete
70deed891d42: Pull complete
Digest: sha256:f2ad209efe9c67104167fc609cca6973c8422939491c9345270175a300419f94
Status: Downloaded newer image for mysql:5.7.36
docker.io/library/mysql:5.7.36

C:\Users\2023020701>docker images
REPOSITORY   TAG       IMAGE ID       CREATED         SIZE
nginx        latest    904b8cb13b93   3 weeks ago     142MB
php          7.4-fpm   38f2b691dcb8   4 months ago    443MB
mysql        5.7.36    c20987f18b13   15 months ago   448MB


C:\Users\2023020701>docker restart myphp-fpm
myphp-fpm

C:\Users\2023020701>docker ps
CONTAINER ID   IMAGE          COMMAND                  CREATED        STATUS        PORTS
NAMES
8aaa9e05e375   mysql:5.7.36   "docker-entrypoint.s…"   16 hours ago   Up 16 hours   33060/tcp, 0.0.0.0:3308->3306/tcp   mysql-test
9a2759fa77cf   nginx          "/docker-entrypoint.…"   16 hours ago   Up 16 hours   0.0.0.0:8081->80/tcp				nginx
5cb69857c4e7   38f2b                          ypoi…"   16 hours ago   Up 3 hours    9000/tcp
启动MySQL
C:\Users\2023020701>docker run --name mysql-test -p 3308:3306 -v D:/docker/mysql/conf:/etc/mysql/conf.d -v D:/docker/mysql/logs:/logs -v D:/docker/mysql/data:/mysql_data -e MYSQL_ROOT_PASSWORD=123456 -d mysql:5.7.36
8aaa9e05e3751a4495196a3df7952c214acdf868bd8dc42021178e1ab6b184a7


参数:
    -p 3306:3306: 将容器的3306端口映射到主机的3306端口
    -v D:/web/www.ck.com/mysql/conf:/etc/mysql/conf.d : 将主机D:/web/www.ck.com/mysql/conf目录挂载到容器的/etc/mysql/conf.d
    -e MYSQL_ROOT_PASSWORD=123456: 初始化root用户的密码
    -d: 后台运行容器,并返回容器ID
C:\Users\2023020701>docker ps
CONTAINER ID   IMAGE          COMMAND                  CREATED          STATUS          PORTS                                NAMES
05e85243d851   mysql:5.7.36   "docker-entrypoint.s…"   20 seconds ago   Up 19 seconds   33060/tcp, 0.0.0.0:3308->3306/tcp   mysql-test
3cf761fae1c2   nginx:latest   "/docker-entrypoint.…"   2 days ago       Up 2 days       0.0.0.0:8080->80/tcp                nginx
60af9ddc091c   38f2b691dcb8   "docker-php-entrypoi…"   2 days ago       Up 2 days       9000/tcp                            myphp-fpm
进入容器内部, 命令行登录mysql
# mysql -uroot -p
Enter password:            #然后直接输入密码即可 密码是在运行时设置的
Welcome to the MySQL monitor.  Commands end with ; or \g.
Your MySQL connection id is 2
Server version: 5.7.36 MySQL Community Server (GPL)
Copyright (c) 2000, 2021, Oracle and/or its affiliates.
Oracle is a registered trademark of Oracle Corporation and/or its
affiliates. Other names may be trademarks of their respective
owners.
Type 'help;' or '\h' for help. Type '\c' to clear the current input statement.
mysql>
Navicat连接Docker中的MySQL
用root账号登录MySQL后先用 SHOW DATABASES 查看数据库
mysql> show databases;
+--------------------+
| Database           |
+--------------------+
| information_schema |
| mysql              |
| performance_schema |
| sys                |
+--------------------+
4 rows in set (0.00 sec)
mysql> ALTER USER 'root'@'%' IDENTIFIED WITH mysql_native_password BY '123456';
Query OK, 0 rows affected (0.00 sec)
mysql> FLUSH PRIVILEGES;
Query OK, 0 rows affected (0.00 sec)
mysql> select host,user,plugin,authentication_string from mysql.user;
+-----------+---------------+-----------------------+-------------------------------------------+
| host      | user          | plugin                | authentication_string                     |
+-----------+---------------+-----------------------+-------------------------------------------+
| localhost | root          | mysql_native_password | *6BB4837EB74329105EE4568DDA7DC67ED2CA2AD9 |
| localhost | mysql.session | mysql_native_password | *THISISNOTAVALIDPASSWORDTHATCANBEUSEDHERE |
| localhost | mysql.sys     | mysql_native_password | *THISISNOTAVALIDPASSWORDTHATCANBEUSEDHERE |
| %         | root          | mysql_native_password | *6BB4837EB74329105EE4568DDA7DC67ED2CA2AD9 |
+-----------+---------------+-----------------------+-------------------------------------------+
4 rows in set (0.00 sec)
mysql>
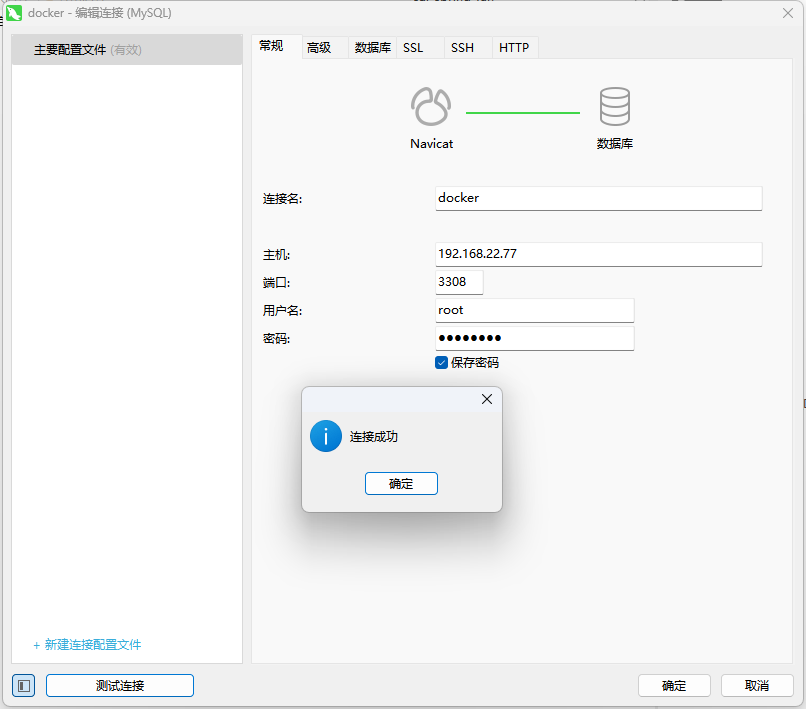
打开Navicat--连接,先在常规界面输入连接名(随意),主机填写上面查到的IP,端口默认就是你MySQL的端口号(默认为3306),你的用户名以及密码

第九步:docker PHP连接MySQL
访问phpinfo页面,查看是否有pdo_mysql,如果没有,说明没有pdo_mysql扩展,需要编译
编译方法如下:
到docker的php容器中,在php文件夹下:
docker-php-ext-install pdo pdo_mysql
重启php-fpm,查看phpinfo()信息。
C:\Users\2023020701>docker restart php-fpm
新建数据库 test. 新建表users.
CREATE TABLE `users`  (
  `id` int(11) NOT NULL AUTO_INCREMENT,
  `username` varchar(255) CHARACTER SET utf8 COLLATE utf8_general_ci NULL DEFAULT NULL,
  `sex` int(11) NULL DEFAULT NULL,
  PRIMARY KEY (`id`) USING BTREE
) ENGINE = InnoDB CHARACTER SET = utf8 COLLATE = utf8_general_ci ROW_FORMAT = Dynamic;
编辑index.php文件
try{
    $pdo=new PDO('mysql:host=192.168.22.77;port=3308;dbname=test','root','123456');
    $sql='INSERT into users (username,sex) VALUES ("king",1)';
    //echo $sql ."<br>";
    $res=$pdo->exec($sql);
	var_dump($res);
    echo '受影响的记录的条数为:'.$res."<br>";
    echo '最后插入的ID号为'.$pdo->lastInsertId()."<br>";

    $sql='select id,username,sex from users';
    $stmt=$pdo->query($sql);               //执行SQL语句,返回PDOStatement对象
    foreach($stmt as $row){
        //print_r($row);
        echo '编号:'.$row['id'];
        echo '用户名:'.$row['username'];
        echo '性别:'.$row['sex']."<br>";
    }
}catch(PDOException $e){
	var_dump(111);
    echo $e->getMessage();
} 
本文为崔凯原创文章,转载无需和我联系,但请注明来自冷暖自知一抹茶ckhttp://www.cksite.cn

- 最新评论
- 总共0条评论

