centos7使用docker安装nginx_php_mysql_phpmyadmin_redis
官网:https://www.docker.com/
中文网官网:http://docker.p2hp.com/
镜像仓库地址:https://hub.docker.com/
Supported tags and respective Dockerfile links:https://github.com/docker-library/docs/blob/master/php/README.md#supported-tags-and-respective-dockerfile-links
1、docker安装
官网 :https://docs.docker.com/install/
找到 linux --Centos,操作步骤如下
Install Docker Engine on CentOS
直接按照他的操作步骤进行即可,抄录一下
1.1). Set up the repository
[root@localhost ~]# sudo yum install -y yum-utils

[root@localhost ~]# sudo yum-config-manager --add-repo https://download.docker.com/linux/centos/docker-ce.repo
1.2). Install Docker Engine
[root@localhost ~]# sudo yum install docker-ce docker-ce-cli containerd.io docker-buildx-plugin docker-compose-plugin
【问题】CentOS8安装Docker出现下错误
.....
  - package containerd.io-1.2.4-3.1.el7.x86_64 is filtered out by modular filtering
  - package containerd.io-1.2.5-3.1.el7.x86_64 is filtered out by modular filtering
  - package containerd.io-1.2.6-3.3.el7.x86_64 is filtered out by modular filtering
(try to add '--skip-broken' to skip uninstallable packages or '--nobest' to use not only best candidate packages)
【解决方法】
wget https://download.docker.com/linux/centos/7/x86_64/stable/Packages/containerd.io-1.2.13-3.1.el7.x86_64.rpm

yum -y install ./containerd.io-1.2.13-3.1.el7.x86_64.rpm
1.3). 启动 Docker.
[root@localhost ~]# sudo systemctl start docker
1.4). 验证是否安装成功
[root@localhost ~]# sudo docker run hello-world
1.5). 设置开机启动的话,继续
[root@localhost ~]# sudo systemctl list-unit-files |grep docker
docker.service                                disabled
docker.socket                                 disabled
[root@localhost ~]# sudo systemctl enable docker
Created symlink from /etc/systemd/system/multi-user.target.wants/docker.service to /usr/lib/systemd/system/docker.service.
1.6) docker 其他命令
docker version                #查看配置版本
docker help                    #查看 Docker 的帮助文档。

docker container top web            #top 查看容器中运行的进程信息,支持 ps 命令参数
     -a  输出所有容器统计信息,默认仅在运行中
    -format  格式化输出信息
    -no-stream 不持续输出,默认自动更新持续实时结果
    -no-trunc 不截断输出信息

docker container inspect web        #inspect 查看容器详情
    -f         指定返回值的模板文件
    -s         显示总文件大小
    --type   为指定类型返回JSON

docker container port web        # 查看web容器的端口映射情况

docker container diff web        # 查看web容器内的文件结构更改
1.7) 更换镜像源
Docker 工作的基础即是镜像。您可以认为一个镜像即是一个独立的由应用组成的虚拟机。为此,docker 建立了 Docker Hub 来存贮镜像(就像GitHub一样)。
但是由于网络原因, Docker Hub 的访问速度过慢,推荐您更换为国内的镜像源地址。这里我们采用 腾讯云 Docker 镜像加速,请输入下面的命令:
[root@localhost ~]# sudo vim /etc/docker/daemon.json
写入以下文本
{
        "registry-mirrors": [
                "https://registry.docker-cn.com",
                "https://hub-mirror.c.163.com/",
                "https://mirror.ccs.tencentyun.com"
        ]
}
重启docker
[root@localhost ~]# sudo systemctl restart docker
虚拟机环境配置
虚拟机ip :192.168.181.131
Docker :24.0.7
Linux系统版本 :centos 7.9.2009
Nginx :1.25.3
Php :8.2.12
Mysql :8.0.35
Redis :6.0.2
容器IP的查方法
docker inspect 容器ID或容器名 |grep '"IPAddress"'
宿主机创建映射目录
[root@localhost /]# mkdir -pv /docker/nginx/{conf,logs,html}

[root@localhost /]# mkdir -pv /docker/php/{conf,logs}

[root@localhost /]# mkdir -pv /docker/redis/{conf,data}

[root@localhost /]# mkdir -pv /docker/mysql/{conf,data,logs}

[root@localhost /]# tree docker
docker
├── mysql
│   ├── conf
│   ├── data
│   └── logs
├── nginx
│   ├── conf
│   ├── html
│   └── logs
├── php
│   ├── conf
│   └── logs
└── redis
    ├── conf
    └── data

14 directories, 0 files
2、安装 PHP
2.1). 下载php镜像
[root@localhost /]# docker pull php:8.2-fpm
#other
[root@localhost /]# docker pull php:7.4-fpm

[root@localhost /]# docker images
REPOSITORY    TAG       IMAGE ID       CREATED        SIZE
php           8.2-fpm   be4fe29b0ade   2 weeks ago    494MB
hello-world   latest    9c7a54a9a43c   6 months ago   13.3kB
2.2). 启动php
[root@localhost /]# docker run -d -p 9000:9000 --name  myphp82 \
> -v /docker/nginx/html:/var/www/html \
> php:8.2-fpm
e746a9de451d13ecf7edc8118b0c69c1b1f2bd153b8a66958f0005e1b7c59ec8


参数说明:
--rm:表示这个容器执行完后会被直接销毁(docker stop nginx之后,该容器被销毁)。
-d:表示这个容器会在后台运行。
--name  myphp82:将容器命名为 myphp82
-v /usr/share/nginx/html:/var/www/html : 将宿主机的网站目录(/docker/nginx/html)挂载到容器的网站目录(/var/www/html)
-p 9000:9000:将容器myphp82的 9000 端口映射到宿主机的 9000 端口
     *** php 缺省端口是 9000 ,如果宿主机也安装过php,可能会冲突,可以改到 9001
2.3). 查看容器相关信息
[root@localhost /]# docker inspect be4fe29b0ade    #获取容器/镜像的元数据
[root@localhost /]# docker ps -a    #显示所有的 docker 容器,包括运行还是未运行的
CONTAINER ID   IMAGE         COMMAND                   CREATED         STATUS                    PORTS                                       NAMES
6dc7b31dd3f9   php:8.2-fpm   "docker-php-entrypoi…"   3 minutes ago   Up 3 minutes              0.0.0.0:9000->9000/tcp, :::9000->9000/tcp   myphp82
af1e70b4dab9   hello-world   "/hello"                  14 hours ago    Exited (0) 14 hours ago                                               focused_cerf

#获取正在运行的容器myphp82的 IP
[root@localhost /]# docker inspect --format='{{range .NetworkSettings.Networks}}{{.IPAddress}}{{end}}' myphp82
172.17.0.2
2.4). 复制容器内的默认配置文件
[root@localhost /]# docker cp myphp82:/usr/local/etc/php/php.ini-production /docker/php/conf/php.ini
Successfully copied 75.8kB to /docker/php/conf/php.ini

[root@localhost conf]# docker stop myphp82
myphp82
[root@localhost conf]# docker rm myphp82
myphp82

[root@localhost /]# docker run -d -p 9000:9000 --name  myphp82 \
> -v /docker/php/conf:/usr/local/etc/php \
> -v /docker/nginx/html:/var/www/html \
> php:8.2-fpm
e746a9de451d13ecf7edc8118b0c69c1b1f2bd153b8a66958f0005e1b7c59ec8


[root@localhost conf]# docker cp myphp82:/usr/local/etc/php/php.ini-production /docker/php/conf/php.ini
Successfully copied 75.8kB to /docker/php/conf/php.ini
3. 安装nginx
3.1) 下载nginx镜像
[root@localhost /]# docker pull nginx
3.2) 启动nginx
[root@localhost /]# docker run -d --name nginx -p 80:80 nginx
76e42db76a1b68758b5bee38c7fe7d2fb30db9524cc7cedbfc9a1dd64fa926b0
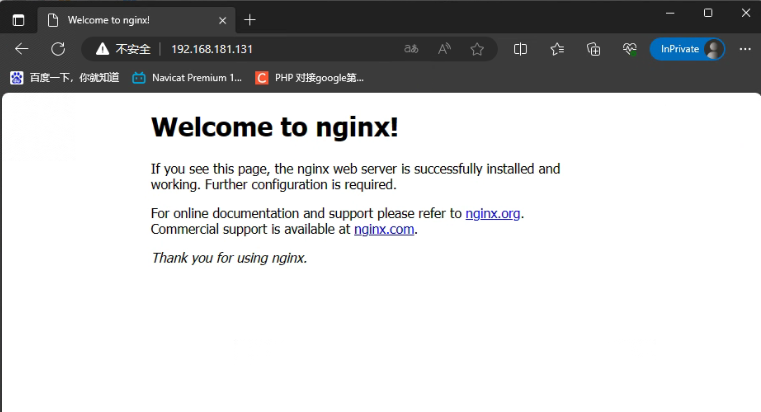
在浏览器访问 http://192.168.181.131:80,显示nginx默认信息页面
3.3) 把nginx容器里面的配置文件拷贝linux宿主机上
[root@localhost /]# docker cp nginx:/etc/nginx/nginx.conf /docker/nginx/conf/ [root@localhost /]# docker cp nginx:/etc/nginx/conf.d /docker/nginx/conf [root@localhost /]# docker cp nginx:/usr/share/nginx/html /docker/nginx/ #[root@localhost /]# docker cp nginx:/var/log/nginx/ /docker/nginx/logs [root@localhost /]# tree docker/nginx/ docker/nginx/ ├── conf │ ├── conf.d │ │ └── default.conf │ └── nginx.conf ├── html │ ├── 50x.html │ └── index.html └── logs
挂载文件
我们可以使用docker exec -it 902f /bin/bash进入容器内部进行配置文件的管理(容器就是一台linux机器),但是比较麻烦,我们可以将这台容器的文件挂载到我们本机,这样我们只要在本机修改文件即可。
容器内部的文件路径如下:
/etc/nginx //配置文件目录
/usr/share/nginx/html //默认html文件目录
/var/log/nginx //日志文件
3.4) 修改 default.conf 配置文件
[root@localhost /]# /docker/nginx/conf/conf.d [root@localhost conf.d]# vim default.conf #编辑 root 根目录,和php保持一致 root /var/www/html
3.5) 停止nginx容器,并删除容器
[root@localhost /]# docker stop 76e42db76a1b 76e42db76a1b [root@localhost /]# docker rm 76e42db76a1b 76e42db76a1b
3.6) 启动nginx
[root@localhost /]# docker run -d --name nginx -p 80:80 \ > -v /docker/nginx/conf/nginx.conf:/etc/nginx/nginx.conf \ > -v /docker/nginx/conf/conf.d/:/etc/nginx/conf.d \ > -v /docker/nginx/html:/var/www/html \ > -v /docker/nginx/logs:/var/log/nginx \ > nginx 83d4711014098c83c8f2afaa406a0240c02ca701c7d2518fc50608e4fa01a1fe
-v /docker/nginx/www:/usr/share/nginx/html
-v /docker/nginx/conf/conf.d:/etc/nginx/conf.d
通过挂载的方式启动后,想更新代码的话只需在主机中修改/docker/nginx/html下的代码,不需要重启nginx。
3.7) 修改 index.html 文件内容
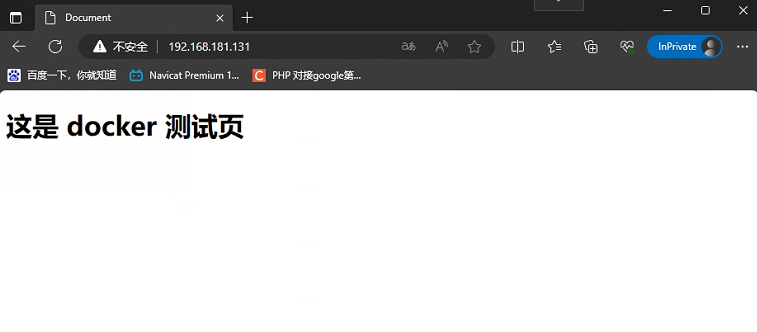
查看容器是否加载宿主机项目[3.4 是否生效]
[root@localhost /]# cd /docker/nginx/html [root@localhost html]# vim index.html #编辑内容 <!DOCTYPE html> <html> <head> <meta charset="UTF-8"> <title>Document</title> </head> <body> <h1> 这是 docker 测试页</h1> </body> </html>
3.8) 在浏览器再次访问 http://192.168.181.131
3.9) 查看容器内nginx日志
方式一 - 查看映射到主机的日志内容:
        [root@localhost /] cd /docker/nginx/logs
        [root@localhost logs]# tail -f error.log            #查看nginx错误日志
        2023/11/19 13:34:30 [error] 23#23: *4 open() "/var/www/html/index.php" failed (2: No such file or directory), client: 192.168.181.1, server: localhost, request: "GET /index.php HTTP/1.1", host: "192.168.181.131"
        [root@localhost logs]# tail -f access.log        #查看nginx访问日志

方式二 - 进入容器内部查看日志:
        [root@localhost /]# docker exec -it nginx /bin/sh
        # cd /var/log/nginx
        # tail -f error.log
3.10 扩展-nginx其他配置
3.10.1 nginx.conf配置信息如下
user  nginx;
worker_processes  1;

pid        /var/run/nginx.pid;
error_log  /var/log/nginx/error.log warn;

events {
    worker_connections  1024;
}


http {
    include       /etc/nginx/mime.types;
    default_type  application/octet-stream;

    log_format  main  '$remote_addr - $remote_user [$time_local] "$request" '
                      '$status $body_bytes_sent "$http_referer" '
                      '"$http_user_agent" "$http_x_forwarded_for"';

    access_log /dev/null;
    #access_log  /var/log/nginx/access.log  main;

    sendfile        on;
    #tcp_nopush     on;

    keepalive_timeout  65;

    gzip  on;

	#引入http配置文件
    include /etc/nginx/conf.d/http/*.conf;
}

#引入tcp配置文件
stream {
    include /etc/nginx/conf.d/tcp/*.conf;
}
3.10.2 http的配置模板-模板1
server {
    listen       80;
    listen  [::]:80;
    server_name  localhost;
    root /usr/share/nginx/html;
    index index.html index.php;
    location / {
    }

    location /api/test/ {
           proxy_set_header Host $host; #防止nginx修改请求头的host为代理host
           proxy_set_header X-Real-IP $remote_addr;
           proxy_set_header X-Forwarded-For $proxy_add_x_forwarded_for;
           proxy_set_header X-Forwarded-Port $http_port;
           proxy_pass http://172.17.0.3:9000/;
    }
}
3.10.3 http的配置模板-模板2
server {
    listen       9501;
    listen  [::]:9501;

    server_name  localhost;
    root /docker/www;
    index index.php index.html;

    error_page   500 502 503 504  /50x.html;

    location = /50x.html {
        root   /docker/www;
    }

    location /home {
       index index.html index.php;
    }

	location ~ \.php$ {
		root /docker/www/;
		fastcgi_pass 172.17.0.3:9000;
		fastcgi_index index.php;
		fastcgi_param SCRIPT_FILENAME $document_root$fastcgi_script_name;
		include fastcgi_params;
	}
}
3.10.3 代理swoole-http项目
upstream swoole {
   server 172.17.0.3:5200 weight=5 max_fails=3 fail_timeout=30s;
   keepalive 16;
}

server {
    listen       9509;
    listen  [::]:5200;
    server_name  localhost;
    root /docker/www/lmrs/public;
    index index.php index.html;

    location / {
        try_files $uri @laravels;
    }

    location @laravels {
        proxy_http_version 1.1;
        proxy_set_header Connection "";
        proxy_set_header X-Real-IP $remote_addr;
        proxy_set_header X-Real-PORT $remote_port;
        proxy_set_header X-Forwarded-For $proxy_add_x_forwarded_for;
        proxy_set_header Host $http_host;
        proxy_set_header Scheme $scheme;
        proxy_set_header Server-Protocol $server_protocol;
        proxy_set_header Server-Name $server_name;
        proxy_set_header Server-Addr $server_addr;
        proxy_set_header Server-Port $server_port;
        proxy_pass http://swoole;
    }
}
3.10.4 跨域处理
location / {
 .
 .
 .
 	    set $origin '*';
            if ($http_origin) {
                set $origin "$http_origin";
            }

        add_header Access-Control-Allow-Origin "$origin";
        add_header Access-Control-Allow-Credentials "true";
        add_header Access-Control-Allow-Methods 'GET, POST, OPTIONS';
        add_header Access-Control-Allow-Headers 'Origin,Access-Control-Request-Headers,Access-Control-Allow-Headers,DNT,X-Requested-With,X-Mx-ReqToken,Keep-Alive,User-Agent,X-Requested-With,If-Modified-Since,Cache-Control,Content-Type,Accept,Connection,Cookie,X-XSRF-TOKEN,X-CSRF-TOKEN,Authorization';
 .
 .
 .
}
3.10.4 tcp的配置模板
upstream config-ssh {
   hash $remote_addr consistent;
   server 172.17.0.3:9501 weight=5 max_fails=3 fail_timeout=30s;
}
server {
   #监听端口
   listen 9501;
   proxy_connect_timeout 10s;
   #设置客户端和代理服务之间的超时时间,如果5分钟内没操作将自动断开。
   proxy_timeout 300s;
   proxy_pass config-ssh;
}
4. nginx 关联php
4.1 修改 nginx default.conf 配置
[root@localhost /]# cd /docker/nginx/conf/conf.d
[root@localhost conf.d]# vim default.conf


server {
    listen       80;
    listen  [::]:80;
    server_name  localhost;

    #access_log  /var/log/nginx/host.access.log  main;

    location / {
        root   /var/www/html;
        index  index.html index.htm index.php;
    }

    #error_page  404              /404.html;

    # redirect server error pages to the static page /50x.html
    #
    error_page   500 502 503 504  /50x.html;
    location = /50x.html {
        root   /var/www/html;    #重要
    }

    # proxy the PHP scripts to Apache listening on 127.0.0.1:80
    #
    #location ~ \.php$ {
    #    proxy_pass   http://127.0.0.1;
    #}

    # pass the PHP scripts to FastCGI server listening on 127.0.0.1:9000
    #
    location ~ \.php$ {
        #root           /var/www/html;
        fastcgi_pass   myphp82:9000;        #重要
        fastcgi_index  index.php;
        fastcgi_param  SCRIPT_FILENAME  /var/www/html$fastcgi_script_name;  #重要
        include        fastcgi_params;
    }

    # deny access to .htaccess files, if Apache's document root
    # concurs with nginx's one
    #
    #location ~ /\.ht {
    #    deny  all;
    #}
}
** centos 7 缺省的 nginx WEB 目录不在 /var/www/html ,而是 /usr/share/nginx/html
** 以上 root /var/www/html; 指的是 宿主机的 /var/www/html 映射到 docker 容器伤的 WEB 目录
php 配置
location ~ \.php$ {
	 # include fastcgi.conf;
	 # this is on local
	 # root         /usr/share/nginx/html;
	 # thsi is on docker,not local /var/www/html
	  root         /var/www/html;

	 fastcgi_split_path_info ^(.+\.php)(/.+)$;
	 #fastcgi_pass unix:/var/run/php-fpm/php-fpm.sock;
	 fastcgi_pass 127.0.0.1:9000;
	 fastcgi_param SCRIPT_FILENAME
	 $document_root$fastcgi_script_name;
	 fastcgi_param PATH_INFO $uri;
	 fastcgi_param SCRIPT_NAME $fastcgi_script_name;
	 fastcgi_index index.php;
	 include fastcgi_params;
}
4.2 重新启动容器
[root@localhost conf.d]# docker ps            #显示正在运行的容器
CONTAINER ID   IMAGE         COMMAND                   CREATED             STATUS             PORTS                                       NAMES
ded49eac3ae9   nginx         "/docker-entrypoint.…"   27 minutes ago      Up 27 minutes      0.0.0.0:80->80/tcp, :::80->80/tcp           nginx
9a5256f33843   php:8.2-fpm   "docker-php-entrypoi…"   About an hour ago   Up About an hour   0.0.0.0:9000->9000/tcp, :::9000->9000/tcp   myphp82

[root@localhost conf.d]# docker stop ded49eac3ae9
ded49eac3ae9
[root@localhost conf.d]# docker rm  ded49eac3ae9
ded49eac3ae9

[root@localhost conf.d]# docker run -d  --name nginx -p 80:80 -v /docker/nginx/conf/nginx.conf:/etc/nginx/nginx.conf -v /docker/nginx/conf/conf.d/:/etc/nginx/conf.d -v /docker/nginx/html:/var/www/html -v /docker/nginx/logs:/var/log/nginx --link myphp82:8.2-fpm nginx
4ff2024e955cc953c9aa08f0d1821aff8dbdea93c6bafcdd5379b81844f00fab
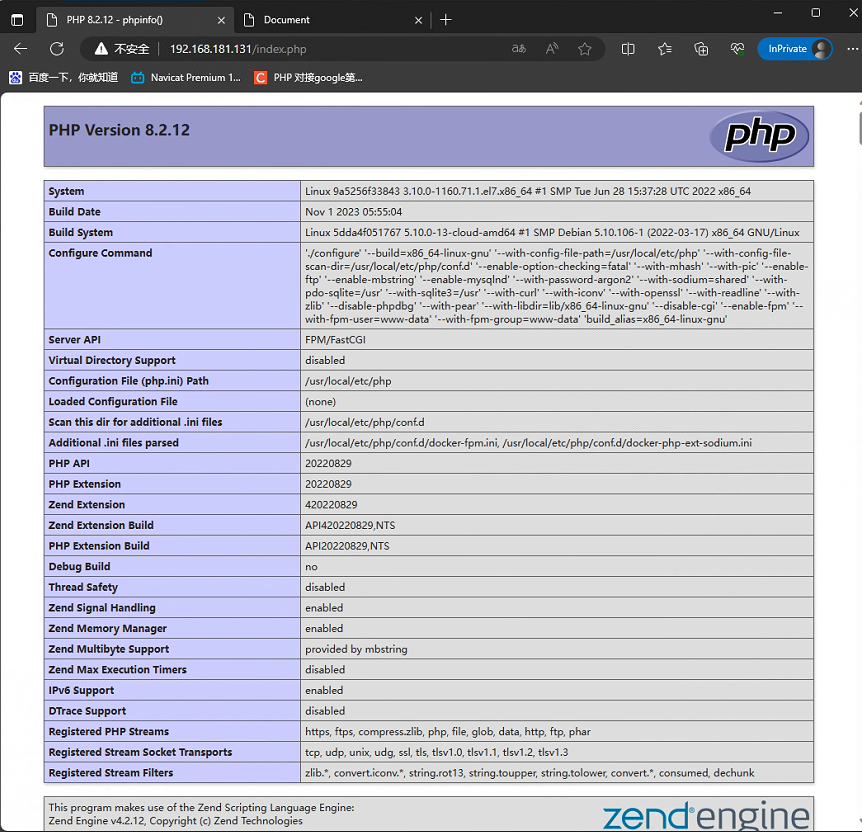
4.3 测试一下
[root@localhost /]# curl 127.0.0.1/index.php
[root@localhost /]# curl 192.168.181.131/index.php
浏览器下打开网址:<http://192.168.181.131/index.php>
5. 安装MySQL
5.1 下载MySQL镜像
[root@localhost /]# docker pull mysql:8.0
[root@localhost /]# sudo docker pull mysql:5.7


[root@localhost html]# docker images
REPOSITORY    TAG       IMAGE ID       CREATED        SIZE
php           8.2-fpm   be4fe29b0ade   2 weeks ago    494MB
nginx         latest    c20060033e06   2 weeks ago    187MB
mysql         8.0       96bc8cf3633b   3 weeks ago    582MB
mysql         5.7       bdba757bc933   3 weeks ago    501MB
hello-world   latest    9c7a54a9a43c   6 months ago   13.3kB
5.2 启动MySQL
[root@localhost /]# docker run -d --name mysql8.0 -p 3306:3306 -e MYSQL_ROOT_PASSWORD=123456 \
> -v /docker/mysql/conf/my.cnf:/etc/mysql/my.cnf \
> -v /docker/mysql/data:/var/lib/mysql \
> -v /docker/mysql/logs:/var/log/mysql \
> mysql:8.0
f936db3b5e1730159dda652ec9b8def34b402364159d81bd399c3e2e35d8c452
5.3 查看MySQL容器信息
[root@localhost /]# docker inspect mysql8.0

...
"Mounts": [
            {
                "Type": "bind",
                "Source": "/docker/mysql/data",
                "Destination": "/var/lib/mysql",
                "Mode": "",
                "RW": true,
                "Propagation": "rprivate"
            },
            {
                "Type": "bind",
                "Source": "/docker/mysql/logs",
                "Destination": "/var/log/mysql",
                "Mode": "",
                "RW": true,
                "Propagation": "rprivate"
            },
            {
                "Type": "bind",
                "Source": "/docker/mysql/conf/my.cnf",
                "Destination": "/etc/mysql/my.cnf",
                "Mode": "",
                "RW": true,
                "Propagation": "rprivate"
            }
        ],
...
"Env": [
                "MYSQL_ROOT_PASSWORD=123456",
                "PATH=/usr/local/sbin:/usr/local/bin:/usr/sbin:/usr/bin:/sbin:/bin",
                "GOSU_VERSION=1.16",
                "MYSQL_MAJOR=8.0",
                "MYSQL_VERSION=8.0.35-1.el8",
                "MYSQL_SHELL_VERSION=8.0.35-1.el8"
            ],
...
 "Gateway": "172.17.0.1",
"IPAddress": "172.17.0.4",
...
5.4 连接 mysql8.0 容器测试
宿主机上远程连接 (刚才inspect 到的容器 IP= 172.17.0.4)
mysql -h172.17.0.4 -uroot -p123456
或
mysql -uroot -p123456
[root@localhost conf.d]# docker exec -it  mysql8.0 /bin/bash    #进入容器查看
bash-4.4# mysql -h172.17.0.4 -uroot -p123456
mysql: [Warning] Using a password on the command line interface can be insecure.
Welcome to the MySQL monitor.  Commands end with ; or \g.
Your MySQL connection id is 8
Server version: 8.0.35 MySQL Community Server - GPL

Copyright (c) 2000, 2023, Oracle and/or its affiliates.

Oracle is a registered trademark of Oracle Corporation and/or its
affiliates. Other names may be trademarks of their respective
owners.

Type 'help;' or '\h' for help. Type '\c' to clear the current input statement.

mysql> show databases;
+--------------------+
| Database           |
+--------------------+
| information_schema |
| mysql              |
| performance_schema |
| sys                |
+--------------------+
4 rows in set (0.01 sec)

mysql> create database school;
Query OK, 1 row affected (0.01 sec)

mysql> show databases;
+--------------------+
| Database           |
+--------------------+
| information_schema |
| mysql              |
| performance_schema |
| school             |
| sys                |
+--------------------+
5 rows in set (0.00 sec)

mysql> exit;
Bye
bash-4.4# mysql -uroot -p123456
mysql: [Warning] Using a password on the command line interface can be insecure.
Welcome to the MySQL monitor.  Commands end with ; or \g.
Your MySQL connection id is 9
Server version: 8.0.35 MySQL Community Server - GPL

Copyright (c) 2000, 2023, Oracle and/or its affiliates.

Oracle is a registered trademark of Oracle Corporation and/or its
affiliates. Other names may be trademarks of their respective
owners.

Type 'help;' or '\h' for help. Type '\c' to clear the current input statement.

mysql> show databases;
+--------------------+
| Database           |
+--------------------+
| information_schema |
| mysql              |
| performance_schema |
| school             |
| sys                |
+--------------------+
5 rows in set (0.00 sec)

mysql>
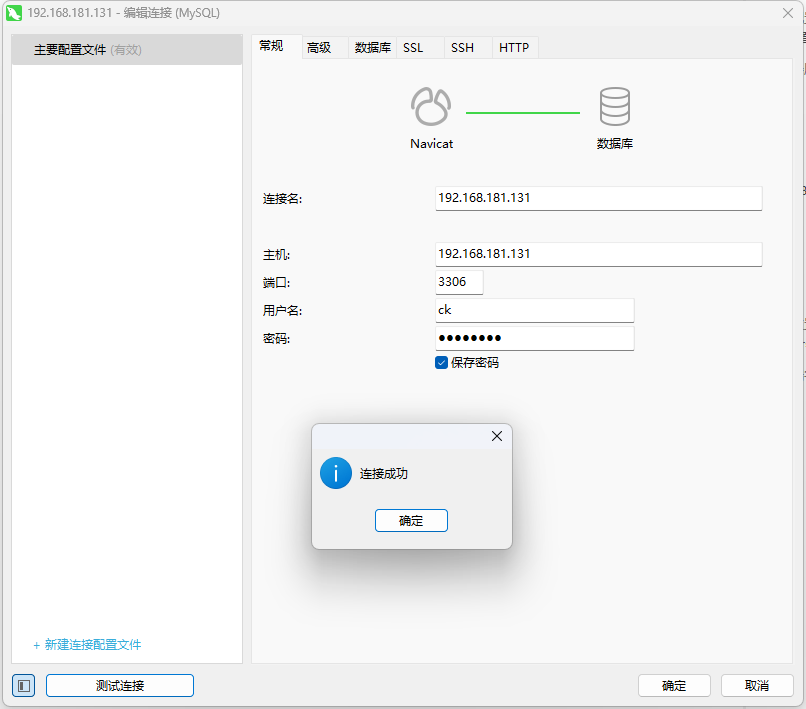
5.5 添加远程连接用户
alter user 'root'@'%' identified with mysql_native_password by '123456';
mysql> alter user 'root'@'%' identified with mysql_native_password by '123456';
Query OK, 0 rows affected (0.01 sec)
如果安装的是Mysql5.6左右的版本,使用如下语句
mysql> CREATE USER 'ck'@'%' IDENTIFIED WITH mysql_native_password BY 'ck123456';
Query OK, 0 rows affected (0.21 sec)
mysql> GRANT ALL PRIVILEGES ON *.* TO 'ck'@'%';
Query OK, 0 rows affected (0.03 sec)
mysql> flush privileges;                                #刷新权限
Query OK, 0 rows affected (0.03 sec)
5.6 设置自启动
现在当我们重启服务器,数据库远程连接时会出现

这是因为我们并没有设置开机自启动,服务器每次重启需要我们手动启动mysql容器docker start 容器id。但是每次都手动启动未免也太麻烦了。
设置mysql容器自启动docker update --restart=always 容器id
[root@localhost ~]# docker restart mysql8.0        #先重启MySQL服务
mysql8.0
[root@localhost ~]# docker ps
CONTAINER ID   IMAGE         COMMAND                   CREATED        STATUS         PORTS                                                  NAMES
f936db3b5e17   mysql:8.0     "docker-entrypoint.s…"   22 hours ago   Up 5 seconds   0.0.0.0:3306->3306/tcp, :::3306->3306/tcp, 33060/tcp   mysql8.0
580473ab60db   nginx         "/docker-entrypoint.…"   25 hours ago   Up 2 minutes   0.0.0.0:80->80/tcp, :::80->80/tcp                      nginx
9a5256f33843   php:8.2-fpm   "docker-php-entrypoi…"   26 hours ago   Up 3 minutes   0.0.0.0:9000->9000/tcp, :::9000->9000/tcp              myphp82
[root@localhost ~]# docker update --restart=always f936db3b5e17
f936db3b5e17
现在服务器重启时,就不需要我们再手动启动了
重启服务器,测试连接,成功。
同理,nginx,php也是同样的操作
[root@localhost ~]# docker update --restart=always nginx
nginx
[root@localhost ~]# docker update --restart=always 9a5256f33843
9a5256f33843
6. 安装 Docker phpMyAdmin
6.1 下载 phpmyadmin 镜像
[root@localhost /]# docker pull phpmyadmin/phpmyadmin
6.2 运行 phpmyadmin
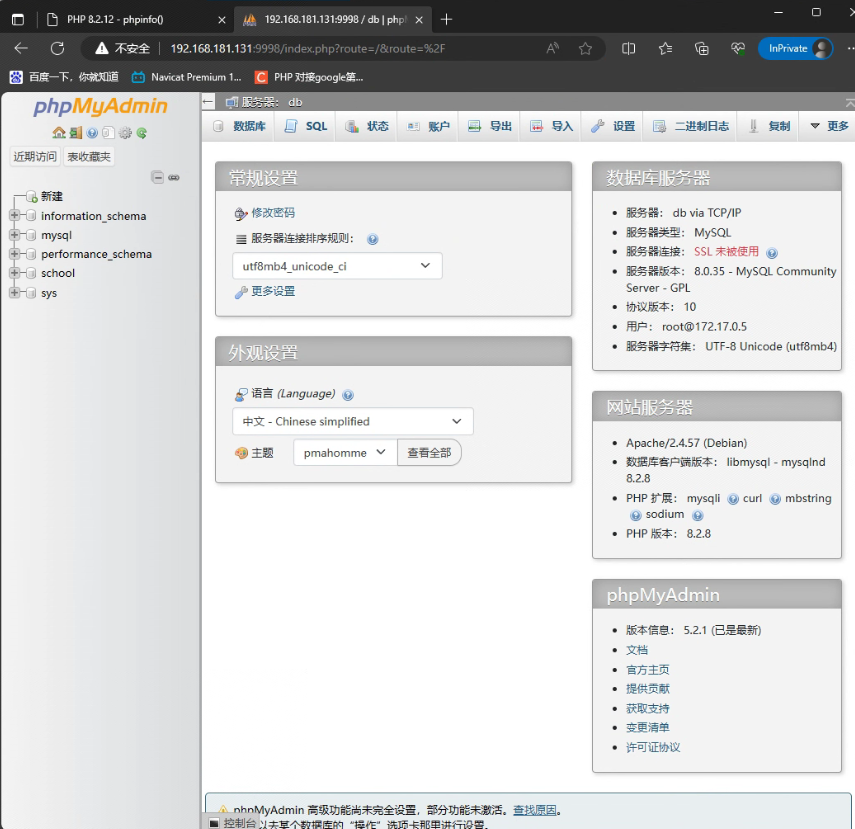
[root@localhost /]# docker run --name phpmyadmin --link mysql8.0:db -p 9998:80 -d phpmyadmin/phpmyadmin
a55eeda2efce6c82c53c972b1aaf5777c1263d512930d298f94362a90330541c
[root@localhost /]# docker images
REPOSITORY              TAG       IMAGE ID       CREATED        SIZE
php                     8.2-fpm   be4fe29b0ade   2 weeks ago    494MB
nginx                   latest    c20060033e06   2 weeks ago    187MB
mysql                   8.0       96bc8cf3633b   3 weeks ago    582MB
mysql                   5.7       bdba757bc933   3 weeks ago    501MB
phpmyadmin/phpmyadmin   latest    933569f3a9f6   4 months ago   562MB
hello-world             latest    9c7a54a9a43c   6 months ago   13.3kB
参数说明:
--name phpmyadmin 容器取名 phpmyadmin
--link mysql8.0 连接到 容器mysql ,给这个 link 一个别名为db
-p 9998:80 宿主机9998 端口对应到 phpmyadmin的 80 端口
6.3 查看 phpmyadmin 容器信息
[root@localhost /]# docker inspect phpmyadmin

...
"Gateway": "172.17.0.1",
"IPAddress": "172.17.0.5",
...
6.4 测试 Docker phpMyAdmin
[root@localhost /]# docker port phpmyadmin
80/tcp -> 0.0.0.0:9998
80/tcp -> [::]:9998

[root@localhost /]# curl 127.0.0.1:9998
[root@localhost /]# curl 192.168.181.131:9998
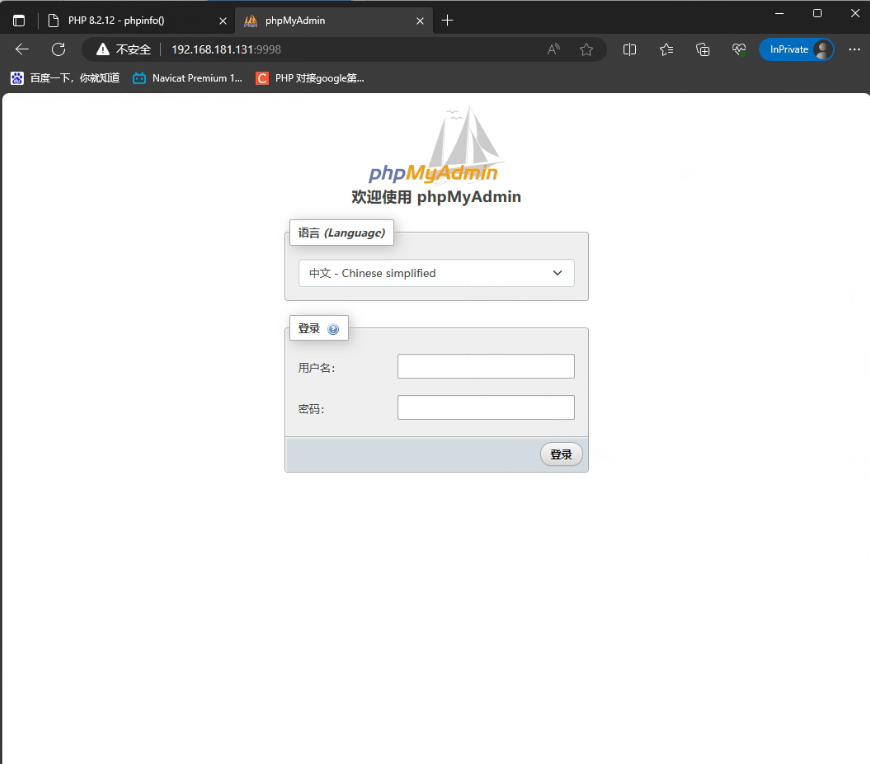
登录查看 mysql
7. 安装PHP扩展
PHP中安装拓展有几个特殊的命令
docker-php-source
docker-php-ext-install
docker-php-ext-enable
docker-php-ext-configure


1. 安装 bcmath扩展
C:\Users\2023020701>docker exec -it php801 /bin/bash
root@cdd58490b14d:/var/www/html# docker-php-ext-install bcmath
root@cdd58490b14d:/var/www/html# docker-php-ext-enable bcmath


安装:
    wget https://pecl.php.net/get/mongodb-1.9.1.tgz

解压:
    tar -zxvf mongodb-1.9.1.tgz

复制mongodb到容器内,假设容器名为
    cp mongodb-1.9.1 /usr/src/php/ext/mongod

进入php容器
cd /usr/src/php/ext/mondb
docker-php-ext-configure mongodb --with-php-config=php-config
docker-php-ext-install mongodb
7.1首先进去容器查看已经安装的扩展
#查看当前正在运行的容器
[root@localhost ~]# docker ps
CONTAINER ID   IMAGE         COMMAND                   CREATED        STATUS         PORTS                                                  NAMES
f936db3b5e17   mysql:8.0     "docker-entrypoint.s…"   22 hours ago   Up 7 minutes   0.0.0.0:3306->3306/tcp, :::3306->3306/tcp, 33060/tcp   mysql8.0
580473ab60db   nginx         "/docker-entrypoint.…"   25 hours ago   Up 7 minutes   0.0.0.0:80->80/tcp, :::80->80/tcp                      nginx
9a5256f33843   php:8.2-fpm   "docker-php-entrypoi…"   26 hours ago   Up 7 minutes   0.0.0.0:9000->9000/tcp, :::9000->9000/tcp              myphp82

#进入容器,查看php当前有的扩展
[root@localhost ~]# docker exec -it 9a5256f33843 /bin/bash
root@9a5256f33843:/var/www/html# php -m
[PHP Modules]
Core
ctype
curl
date
dom
fileinfo
filter
ftp
hash
iconv
json
libxml
mbstring
mysqlnd
openssl
pcre
PDO
pdo_sqlite
Phar
posix
random
readline
Reflection
session
SimpleXML
sodium
SPL
sqlite3
standard
tokenizer
xml
xmlreader
xmlwriter
zlib

[Zend Modules]
7.2 安装mysql扩展直接执行命令
7.2.1 在php容器里面执行,以下命令
root@9a5256f33843:/var/www/html# docker-php-ext-install mysqli
7.2.2 然后输入exit,退出当前容器进入命令行
root@9a5256f33843:/var/www/html# exit
exit
7.2.3 重启php容器
docker restart myphp
[root@localhost ~]# docker restart 9a5256f33843
7.2.4 nginx 项目目录,新增mysql.php测试文件
[root@localhost /]# cd /docker/nginx/html
[root@localhost html]# vim mysql.php

<?php
$servername = "127.0.0.1:3306";
$username = "ck";
$password = "ck123456";
$conn = new mysqli($servername, $username, $password);

// 检测连接
if ($conn->connect_error) {
    die("Connection failed: " . $conn->connect_error);
}
echo "Connected successfully";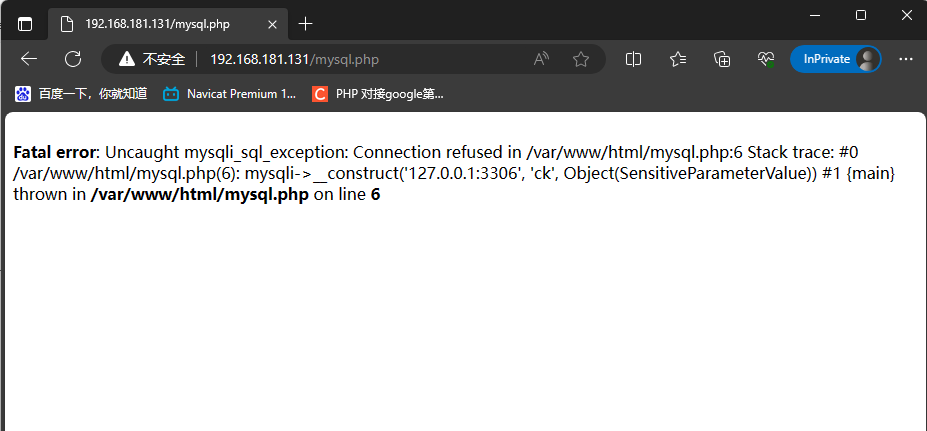
在PHP连接Docker运行中的MySQL容器时,不能用localhost或者127.0.0.1来连接,因为每个docker运行容器的localhost 和127.0.0.1都是当前容器,而不是MySQL容器,需要修改成容器 IP,或者是mysql容器名称
7.2.5 查看MySQL容器的 ip 地址
[root@localhost html]# docker inspect --format='{{.NetworkSettings.IPAddress}}' mysql8.0
172.17.0.3
7.2.6 修改 mysql.php 服务器地址
[root@localhost html]# vim mysql.php
$servername = "127.0.0.1:3306";
改为
$servername = "172.17.0.3:3306";
再次访问 http://192.168.181.131/mysql.php

8 安装redis
8.1 下载 redis镜像
[root@localhost ~]# docker pull redis
8.2 配置redis.conf
1)、在 /docker/redis 目录下创建一个配置文件目录conf。
2)、去redis中文官方网站:http://www.redis.cn/download.html 选择稳定版,然后Download
3)、下载成功后将压缩文件解压,找到目录里的redis.conf配置文件,
4)、然后复制到 /docker/redis/conf目录下(使用docker的方式安装的redis默认没有配置文件,需要手动下载)
修改redis.conf文件配置
#bind 127.0.0.1 #找到当前配置并注释,使Redis容器允许容器外部访问
protected-mode yes 改为 protected-mode no
[root@localhost ~]# cd /docker/redis/conf/
[root@localhost conf]# vim redis.conf

...
bind 127.0.0.1
protected-mode no
...
8.3 启动redis
[root@localhost redis]# docker run -d -p 6379:6379 --name myredis -v /docker/redis/conf:/etc/redis -v /docker/redis/data:/data --restart=always redis redis-server /etc/redis/redis.conf --appendonly yes
e9629546a8a269e4c74e526915d463d3fd7f440829f5ada292bef3f860e4f770

[root@localhost redis]# docker ps
CONTAINER ID   IMAGE         COMMAND                   CREATED         STATUS         PORTS                                                  NAMES
e9629546a8a2   redis         "docker-entrypoint.s…"   4 seconds ago   Up 3 seconds   0.0.0.0:6379->6379/tcp, :::6379->6379/tcp              myredis
a9e549bcb78c   php:8.2-fpm   "docker-php-entrypoi…"   22 hours ago    Up 22 hours    0.0.0.0:9000->9000/tcp, :::9000->9000/tcp              myphp82
c99476408fbb   nginx         "/docker-entrypoint.…"   22 hours ago    Up 22 hours    0.0.0.0:80->80/tcp, :::80->80/tcp                      nginx
f936db3b5e17   mysql:8.0     "docker-entrypoint.s…"   46 hours ago    Up 24 hours    0.0.0.0:3306->3306/tcp, :::3306->3306/tcp, 33060/tcp   mysql8.0
命令行解析如下:
-d 在后台运行容器,并且打印容器id
-p 6380:6379端口映射,把Redis容器 中的 6379映射到本地的 6380端口
--name=myredis 将新创建的容器命名为myredis
-v 本机目录:服务器目录 将本机目录 映射 到容器内的目录
--restart=always 设置容器的重启策略为自动重启 查看Docker如何查询容器重启策略
redis使用redis镜像创建当前容器,没加:版本号默认为latest最新版本
redis-server /etc/redis/redis.confredis按照这个redis.conf的配置启动
-–appendonly yesredis容器启动后数据持久化
查看容器列表 docker ps -a,检查Redis容器是否创建成功
8.4 查看redis是否成功
进入容器,执行redis命令
[root@localhost redis]# docker exec -it myredis /bin/bash
root@e9629546a8a2:/data# redis-cli
127.0.0.1:6379> set aaa 111
OK
127.0.0.1:6379> get aaa
"111"
127.0.0.1:6379>
8.5 设置密码
[root@localhost conf]# vim redis.conf
编辑redis.conf 文件,设置redis 访问密码
requirepass 123456

[root@localhost conf]# docker exec -it myredis /bin/bash
root@e9629546a8a2:/data# redis-cli
127.0.0.1:6379> get aaa
(error) NOAUTH Authentication required.
127.0.0.1:6379> auth 123456
OK
127.0.0.1:6379> get aaa
"111"
127.0.0.1:6379>
8.6 测试
/docker/nginx/html 目录新增 redis.php 文件
[root@localhost /]# cd /docker/nginx/html/
[root@localhost html]# vim redis.php

<?php
$redis = new Redis();

$redis->connect('172.17.0.5', 6379);
$redis->auth('123456');

echo "Connection to server sucessfully";

// 查看服务是否运行
echo "Server is running: " . $redis->ping();
浏览器访问 http://192.168.181.131/redis.php ,报错

报错原因:
安装的PHP缺少Redis扩展: https://pecl.php.net/get/redis-6.0.2.tgz
下载redis扩展包:https://pecl.php.net/package/redis
解决方法
1. 进入需要安装扩展的PHP容器 docker exec -it myphp /bin/bash
2. 容器内切换目录 cd /usr/local/bin
3. 查看PHP容器是是否有redis扩展 php -m
4. 如果没有就需要先下载安装redis扩展至容器内,再启动扩展
curl -L -o /tmp/redis.tar.gz
https://pecl.php.net/get/redis-6.0.2.tgz
cd /tmp
tar -zxvf redis.tar.gz
mv redis-6.0.2/ /usr/src/php/ext/
cd /usr/local/bin
docker-php-ext-install redis-6.0.2
5. 容器内安装并启用redis扩展 docker-php-ext-install redis-6.0.2

6. 退出容器exit
7. 重启php容器 docker restart myphp82
8. 如果运行成功或者不再报以上重复错误那么恭喜你,成功连接Redis内存数据库
[root@localhost html]# docker exec -it myphp82 /bin/bash
root@a9e549bcb78c:/var/www/html# cd /usr/local/bin
root@a9e549bcb78c:/usr/local/bin# php -m
[PHP Modules]
Core
ctype
curl
date
dom
fileinfo
filter
ftp
hash
iconv
json
libxml
mbstring
mysqli
mysqlnd
openssl
pcre
PDO
pdo_sqlite
Phar
posix
random
readline
Reflection
session
SimpleXML
sodium
SPL
sqlite3
standard
tokenizer
xml
xmlreader
xmlwriter
zlib

[Zend Modules]


root@a9e549bcb78c:/# curl -L -o  /tmp/redis.tar.gz https://pecl.php.net/get/redis-6.0.2.tgz
  % Total    % Received % Xferd  Average Speed   Time    Time     Time  Current
                                 Dload  Upload   Total   Spent    Left  Speed
100  357k  100  357k    0     0  98375      0  0:00:03  0:00:03 --:--:-- 98404
root@a9e549bcb78c:/# ls
bin  boot  dev	etc  home  lib	lib32  lib64  libx32  media  mnt  opt  proc  redis.tar.gz  root  run  sbin  srv  sys  tmp  usr	var
root@a9e549bcb78c:/# cd /tmp
root@a9e549bcb78c:/tmp# ls
redis-6.0.2  redis.tar.gz
root@a9e549bcb78c:/tmp# mv redis-6.0.2/ /usr/src/php/ext/
root@a9e549bcb78c:/tmp# cd /usr/local/bin
root@a9e549bcb78c:/usr/local/bin# ls
docker-php-entrypoint  docker-php-ext-configure  docker-php-ext-enable	docker-php-ext-install	docker-php-source  pear  peardev  pecl	phar  phar.phar  php  php-config  phpize

root@a9e549bcb78c:/usr/local/bin# docker-php-ext-install redis-6.0.2

root@a9e549bcb78c:/usr/local/bin# php -m
[PHP Modules]
Core
ctype
curl
date
dom
fileinfo
filter
ftp
hash
iconv
json
libxml
mbstring
mysqli
mysqlnd
openssl
pcre
PDO
pdo_sqlite
Phar
posix
random
readline
redis
Reflection
session
SimpleXML
sodium
SPL
sqlite3
standard
tokenizer
xml
xmlreader
xmlwriter
zlib

[Zend Modules]

root@a9e549bcb78c:/usr/local/bin# cd /usr/local/lib/php/extensions/no-debug-non-zts-20220829
root@a9e549bcb78c:/usr/local/lib/php/extensions/no-debug-non-zts-20220829# ls
mysqli.so  opcache.so  redis.so  sodium.so
root@a9e549bcb78c:/usr/local/lib/php/extensions/no-debug-non-zts-20220829#

root@a9e549bcb78c:/usr/local/lib/php/extensions/no-debug-non-zts-20220829# exit
exit

[root@localhost html]# docker restart myphp82
myphp82
[root@localhost html]#
再次访问 http://192.168.181.131/redis.php ,报错

报错原因:
Redis连接的地址有问题,参考之前Nginx关联PHP容器时修改的配置,改成Redis容器的ip地址
[root@localhost html]# docker inspect --format='{{.NetworkSettings.IPAddress}}' myredis
172.17.0.5
将Redis连接的地址改成Redis容器的IP地址,代码运行成功

如果修改连接的容器IP仍然报以上错误,检查redis.conf配置文件内的bind 127.0.0.1这一行是否注释,如果未注释就加#注释
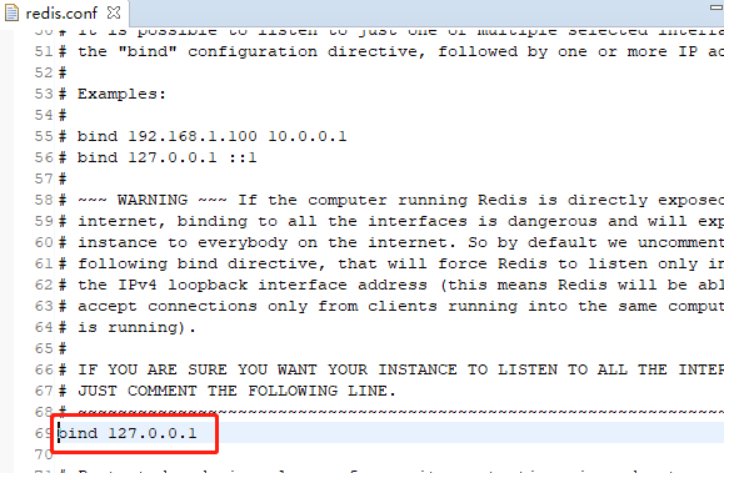
改成这样,加上注释的原因是使Redis容器允许外部访问
#bind 127.0.0.1
修改redis.conf配置后需要重启容器 docker restart myredis
[root@localhost conf]# docker restart myredis
myredis
本文为崔凯原创文章,转载无需和我联系,但请注明来自冷暖自知一抹茶ckhttp://www.cksite.cn
- 上一篇: docker 部署nginx+php+mysql
- 下一篇: win10搭建 Hyperf 3.1

- 最新评论
- 总共0条评论

